Solar panel installation isn’t just about mounting a few panels on your roof—it’s a carefully planned, step-by-step process that ensures your home gets clean, reliable power for decades to come. If you’re curious about how solar panels are installed, this guide will walk you through every stage of the solar panel installation process, from the first site assessment to final grid connection.
At Mack Solar and Roofing, we specialize in residential and commercial solar solutions throughout South Jersey. We believe in educating our customers so they understand every detail of their solar investment. Let’s dive into what you can expect throughout the installation journey.
What to Expect During the Solar Panel Installation Process
The solar panel installation process typically takes a few weeks from start to finish, depending on system complexity, permitting timelines, and weather conditions. Below, we’ve broken down the process into eight key stages to help you see how everything comes together.
Step 1: Site Assessment and Energy Evaluation
Before installing anything, our solar professionals schedule a site visit to evaluate your property and energy usage.
Key Tasks During This Phase:
- Inspect roof condition and structure
- Determine ideal system size based on past utility bills
- Assess shading, pitch, and orientation
- Evaluate electrical panel capacity
We also determine whether roof repairs or reinforcements are needed before moving forward. Since we’re also licensed roofers, we ensure your roof is solar-ready for decades of safe performance.
Why this step matters:
A properly sized and positioned solar system maximizes performance and ensures return on investment. This phase is the foundation of the entire installation.
Step 2: Custom System Design
Once we complete the assessment, our engineers create a custom solar panel system design tailored to your home or business. This includes panel layout, inverter selection, wire routing, and compatibility with your electrical system.
You’ll receive a design plan and estimated energy production report, so you can see how much power your system is expected to generate each year.
Things We Consider in System Design:
- Roof size and shape
- Shading and sun exposure
- Local building codes
- Aesthetic preferences
Step 3: Permitting and Paperwork
Installing solar panels involves several layers of approval. We handle all the paperwork for you—so you don’t have to navigate complex local regulations.
Permits and Applications We File:
- Local building and electrical permits
- Interconnection agreement with the utility
- Applications for net metering
- Applications for state and federal incentives
In South Jersey, net metering is available through your utility, allowing you to sell excess energy back to the grid. We make sure your system qualifies for all local and national benefits.
Learn more about net metering policies through the New Jersey Board of Public Utilities.
Step 4: Equipment Delivery and Preparation
Once permits are approved, we schedule your installation and begin prepping your home. This may include:
- Roof reinforcement (if needed)
- Upgrading the main electrical panel
- Installing a critter guard or snow retention system
We’ll also coordinate the delivery of all necessary components, including:
- Solar panels
- Inverters (string or microinverters)
- Racking/mounting hardware
- Electrical wiring
Our team ensures everything is ready for a smooth and efficient installation day.
Step 5: How Are Solar Panels Installed on the Roof?
Now, the main event: solar panel installation day. This step usually takes one to three days, depending on system size and weather.
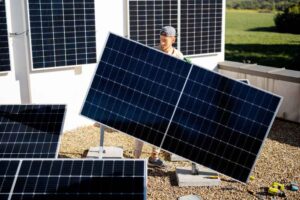
Here’s How Solar Panels Are Installed:
- Mounting the Racks: We install aluminum rails or racking systems on your roof. These are secured to the rafters using lag bolts and sealed for waterproofing.
- Attaching Solar Panels: Panels are then affixed to the racking system using clamps or brackets.
- Running Wiring: Our licensed electricians run wiring from the panels to the inverter, then from the inverter to your main electrical panel.
- Installing the Inverter: Inverters convert DC electricity from the panels into AC electricity your home can use.
- Grounding and System Safety Checks: We make sure everything is bonded and grounded according to code.
Each step is done with precision to ensure safety, performance, and longevity. If you’re wondering exactly how are solar panels installed, this is the most visible part of the process.
Step 6: Inspection and Approval
Once installation is complete, a local inspector must verify the system meets building and electrical codes. We coordinate the inspection and are on-site to assist and answer any questions.
After the inspector signs off, your utility company will schedule an interconnection inspection before granting Permission to Operate (PTO). This ensures your system can safely send energy back to the grid.
Curious about grid integration standards? Check out NREL’s solar interconnection resources.
Step 7: System Activation and Monitoring Setup
After PTO is granted, we activate your system and walk you through how everything works.
What You’ll Learn:
- How to read your inverter
- How to use the monitoring app
- What to expect for monthly performance
- How to track production and net metering credits
We make sure you’re confident managing your system and understanding your savings from day one.
Step 8: Ongoing Support and Maintenance
Once your system is running, you’re not on your own. Our team is available for follow-ups, troubleshooting, and maintenance. We offer annual inspections, performance checks, and panel cleaning services.
Maintaining your solar system helps:
- Ensure peak efficiency
- Extend panel lifespan
- Protect your investment and warranty
You can also learn more about caring for your panels in our solar panel maintenance guide.
What Makes Our Installation Process Different?
At Mack Solar and Roofing, we’re not just a solar company—we’re also expert roofers. That means we approach every project with both energy production and roof integrity in mind.
Here’s what sets us apart in South Jersey:
- In-house roofing and solar teams
- Licensed and insured across NJ and PA
- Certified by SolarEdge, Enphase, and GAF
- Detailed post-installation support
Every project is handled with precision, transparency, and a deep understanding of South Jersey’s local climate and regulations.
How Long Does the Solar Panel Installation Process Take?
Here’s a general timeline for residential projects:
| Phase | Timeframe |
| Site Evaluation | 1–2 days |
| Design & Permits | 2–3 weeks |
| Installation Day(s) | 1–3 days |
| Inspection & PTO | 1–2 weeks |
| Total Time | 3–6 weeks |
Project timelines can vary, but our team is committed to keeping things moving efficiently and keeping you informed every step of the way.
Ready to Get Started? Let’s Talk
Now that you know how solar panels are installed and understand the full solar panel installation process, you might be wondering if your home is a good candidate for solar.
Let’s find out together.
At Mack Solar and Roofing, we offer free inspections and expert recommendations based on your home’s layout, energy use, and goals.
Get a free inspection now and take the first step toward clean, renewable energy with South Jersey’s trusted roofing and solar professionals.